Brownifer Bites: baking
Showing posts with label baking. Show all posts

Thursday, October 19, 2017

Grandma's Banana Bread

This is the banana bread recipe my grandmother made my entire life.  There is no better way of using up over-ripe bananas in my opinion.  We so often have brown bananas since none of us like them once they start to brown.

Up to bat:  Thing #5!  She was excited to make this with me but once we started, she wouldn't let me help.  Our little baker.  She's getting pretty good at this stuff!

So here it is, the family Banana Bread recipe that came from who-knows-where and everyone loves!

Ingredients:

  • 1 1/4 Cups Sugar
  • 1/2 Cup Butter, softened
  • 2 Eggs
  • 1 1/2 Cps Mashed VERY ripe bananas (3-4 medium)
  • 1/2 Cup Buttermilk
  • 1 Teaspoon Vanilla
  • 2 1/2 Cups All-Purpose Flour
  • 1 Teaspoon Baking Soda
  • 1 Teaspoon Salt

Directions:

  • Preheat oven to 400 Degrees
  • Grease bottom of pan(s) - use (2) 8x4-inch loaf pans or (1) 9x5-inch loaf pan
  • In a large bowl, beat together butter & sugar.
  • Add to bowl:  eggs, bananas, buttermilk and vanilla; beat with electric mixer on medium speed until smooth. (also a great time to pick out any banana peels that children may have missed when peeling the bananas!  Yes, it happened.)
  • Stir in flour, baking soda and salt just until moistened.
  • Pour batter in to pan(s)
  • Bake 8-inch loaves 1 hour, 9-inch loaf 1 1/4 hours or until toothpick inserted in center comes out clean.
  • Cool 10 minutes
  • Loosen sides of loaves from pans, remove and place on a cooling rack for about an hour before slicing.
Since we have so many over-ripe bananas in the freezer.... we may experiment with other things to do with this bread!  Stay tuned!

Pumpkin Pie (with recipe)


Thing #4 desperately wanted to make pumpkin pies this weekend, so we indulged him!  This comes at the perfect time for the season anyway, so we thought we would share our recipe with you!

I got our recipe from our local Co-op and it's always a hit!

This recipe calls for pumpkin puree.  If you want to used canned, that is fine too, but if you want to use fresh pumpkin (as we usually do) - buy 1 or 2 baking pumpkins, cut in half, scoop out the center (save the seeds for roasting later!) and lay flat in a baking dish with a bit of water in the bottom and bake at 400 for 35-45 minutes or until a fork is easily inserted into the flesh of the pumpkin.  Scoop the pumpkin out of the skin and into a blender to make your puree.  You would be surprised the added flavor this adds to your pies!

Ingredients:


  • 1 3/4 Cups (or one 15oz can) pumpkin puree (can substitute butternut squash if you prefer)
  • 3 Eggs
  • 1 Cup Half & Half
  • 1/3 Cup Milk
  • 3 Tablespoons Maple Syrup
  • 1 Teaspoon Vanilla Extract
  • 1/2 Cup Sugar
  • 1 1/2 Teaspoons Ground Ginger
  • 1 Teaspoon Ground Cinnamon
  • 1/4 Teaspoon Ground Cloves
  • 1/2 Teaspoon Salt
  • 1 9-inch Homemade Pie Crust or pre-made frozen pie crust
  • Whipped Cream for Topping

Directions:


  • Preheat oven to 400 degrees
  • Put all ingredients into blender and blend until smooth - if you don't have a blender, you can use a large bowl and beat with a mixer.
  • Pour into pie shell and bake at 400 for 15 minutes
  • Reduce heat to 350 and bake for 40-50 minutes or until a knife inserted into the center comes out clean.
  • Cool on a wire rack for 2-3 hours before slicing.
Children are always closely supervised
While cooking and baking in the
Brownifer kitchen.  Especially
when fire is involved.
We let our whipped topping sit on the counter and come to room temperature while the pie was cooling, then spooned it into a piping bag to make the whipped topping look pretty :-) 

The kids have fun making this, it's nice and simple and though I'm not a fan of pumpkin pie, I'm told it's amazing! 

We doubled the recipe for two pies and had some filling left over, so we poured it into ramekins and baked it with the pies in the oven.  When it cooled, we sprinkled it with sugar and torched the sugar like you would for a creme brulee.  We have organic sugar that isn't very fine, so it didn't torch so well.  It was sort of a fail, but it tasted good and they ate it, so .... is it really a fail?  :-)


We'll be making plenty more of these this season, they go FAST!


Wednesday, June 14, 2017

Fluffernutter Cookies (with recipe)

Monday was Peanut Butter Cookie Day and Thing #5 loves any excuse to be in the kitchen baking!  She wasn't thrilled with plain PB cookies, and the 2nd recipe we tried was not to her liking.  Not sweet enough.  I linked to it, however, in case you want to give it your own try!  I think it would be delicious if you were detoxed off sugar!

No, the Fluffernutters were far more interesting to a 9-year old with the marshmallows :-)  I printed a recipe for her and she was ON it!

A couple of comments on the recipe first:

Yes, moving the marshmallows from the edge keeps them from getting chewy and sticking to the wax paper but .... if it happens, don't panic.  It's actually a nice texture and gives it a toasted marshmallow effect.

The 7 minute baking time....I think we make bigger cookies than most?  7 minutes wasn't nearly long enough in our oven.  The centers were not cooked.  We experimented and 12 minutes in the oven with a 5 minute resting time was what worked for what we wanted.  Big spoonfuls, I guess?

This makes a LOT of cookies!  Make sure you have time for baking or use two cookie sheets to bake at a time.

Don't skip the wax paper!  Your cookie sheets will be a nasty mess if you do! :-)

Ingredients:
Yes, organic marshmallows
exist!!!!

  • 1 cup organic butter
  • 1/2 cup creamy peanut butter (we used Adams)
  • 2 tablespoons coconut oil
  • 1 1/2 cups brown sugar (packed)
  • 2 eggs
  • 1/2 teaspoon salt
  • 1 teaspoon vanilla extract
  • 1/2 teaspoon baking soda
  • 1/2 teaspoon baking powder
  • 2 1/4 cups all-purpose flour
  • 2 cups semi-sweet chocolate chips
  • 1 1/2 cup mini-marshmallows
Directions:
  • Preheat oven to 350
  • In a large mixing bowl, cream the butter, peanut butter, oil and sugar until light and creamy
  • Add eggs, salt and vanilla and mix well
  • Mix in baking soda and baking powder and gradually mix in flour until combined.
  • Stir in chips and marshmallows.
  • Drop spoonfuls of dough on parchment-lined cookie sheet about 2" apart (If any marshmallows are on the very edges of the cookies, move them into the middle or they will caramelize and get a bit crunchy)
  • Bake for 7 minutes and let rest on cookie sheet 5 minutes before transferring to a wire cooling rack.
  • Store tightly covered and room temperature


Tuesday, June 13, 2017

Chocolate Cupcakes w/Buttercream Frosting (with recipe)

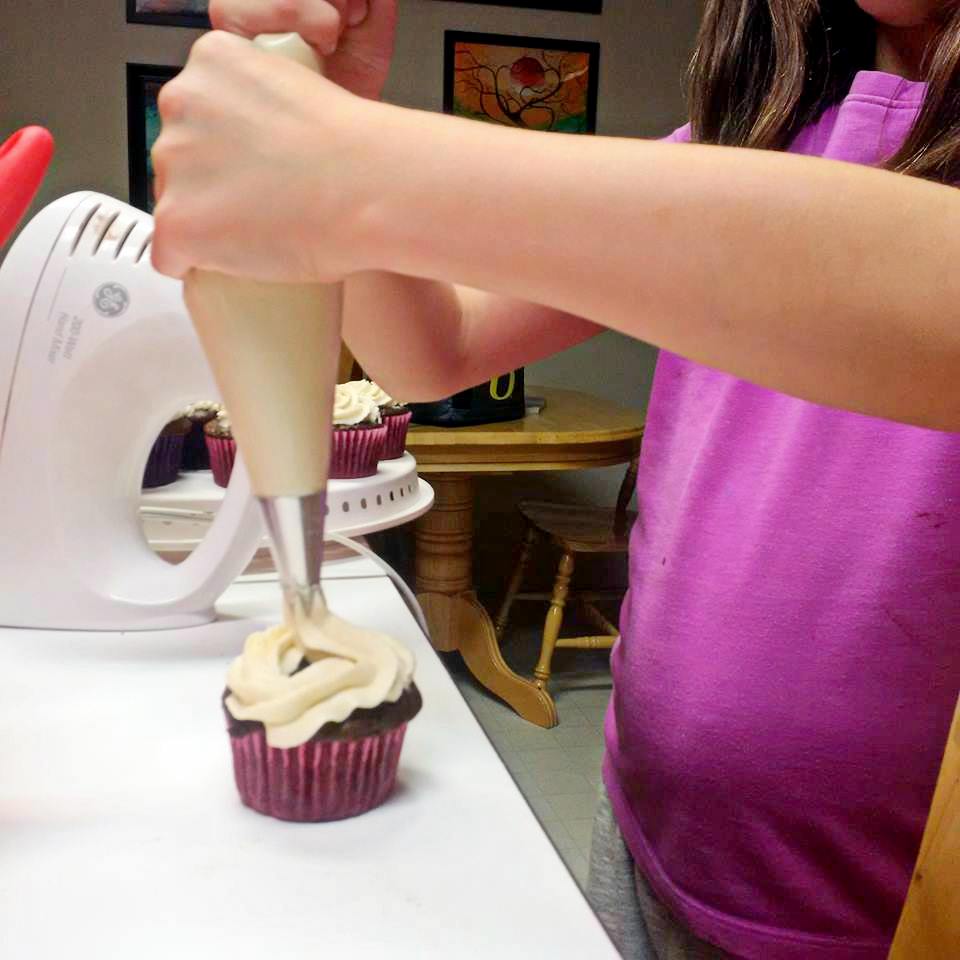
Today is National Cupcake Lovers Day!  In honor of this, Thing #5 was happy to make some cupcakes for the blog last night!  That girl loves to bake!

We used a cake recipe turned cupcake recipe I loved from one of the kids' birthdays and a frosting recipe we downloaded in an e-book from a blog I discovered.  Thing #5 is going to be gaining a LOT of baking insight from them in the future.  Pretty sure they're her soulmates.

Do make sure you have enough time to make these, don't rush it.  Very important to let cupcakes cool completely before putting your frosting on .... but you all know this, right?  You don't need details on how to make a cupcake.

Here are your recipes for cupcakes and homemade buttercream frosting!  On National Cupcake Lovers Day, calories don't count!

CUPCAKES

Ingredients:

  • 1 cup all-purpose flour
  • 1 cup granulated sugar
  • 1/2 cup cocoa powder
  • 1 teaspooon baking powder
  • 1/2 teaspoon baking soda
  • 1/2 teaspoon salt
  • 1/2 teaspoon espresso powder (can't find it?  Here are some alternatives)
  • 1/2 cup milk
  • 1/4 cup vegetable oil
  • 1 large egg
  • 1/2 teaspoon vanilla
  • 1/2 cup boiling water
Directions:
  • Preheat oven to 325 degrees
  • Place cupcake liners in muffin tin
  • Add flour, sugar, cocoa powder, baking powder, baking soda, salt and espresso powder to a large bowl, whisk or stir with a fork to combine.
  • Add milk, oil, egg and vanilla to flour mixture and mix together on medium speed until well combined.
  • Reduce speed and carefully add boiling water to the cake batter, Beat on high speed for about 1 minute to add air to the batter.
  • Evenly distribute cake batter to your cupcake liners - start with 1/2 full and keep distributing until batter is gone
  • Place in the oven and bake until a toothpick inserted in the center comes out clean, about 20 minutes.
  • Remove from the oven and allow the cupcakes to cool completely before frosting
BUTTERCREAM FROSTING:
Ingredients:
  • 4 cups Organic Powdered Sugar 
  • 1 cup (2 sticks) Organic Butter
  • 2-3 teaspoons of Vanilla (we used 3)
  • 1-2 tablespoons Milk
Directions:
  • Add powdered sugar to mixing bowl with softened sticks of butter, vanilla and 1 tbsp. of milk
  • Beat on low until powdered sugar is incorporated.
  • Move mixer up to medium-high speed, scrape sides and bottom of bowl often.
  • When completely mixed the frosting may appear dry
  • First try at piping frosting!  She
    did a great job!
  • Add milk in small amounts at a time until frosting is the consistency you're looking for.

Thing #5 was gifted with her first beginner's frosting piping tips and bags last night and after watching a tutorial on YouTube, she tried her hand at making pretty swirls!  You can just as easily pile on your frosting with a butter knife as we've all done for years.  Either way - these are hands down the BEST chocolate cupcakes with the most amazing frosting .... Happy Cupcake Lovers Day!!!!


Monday, May 29, 2017

Cuban Sandwich Hoagies (with recipe)


I followed a recipe I found here to make the bread for our Cuban Sandwiches.  We wanted authenticity so I spent a Saturday perfecting this bread and making individual sandwich loaves.  This recipe will make 4 Cuban Sandwich Hoagies.

After three batches - I have to say that it turned out well WHEN I used the cornmeal on the baking sheet AND brushed each loaf with the water as instructed.  Both very important for the crispness Cuban Bread and to keep the bottom from becoming hard as a brick.  Yes...that happened!

Ingredients:

1 tablespoon active dry yeast
2 teaspoons sugar
1 1/4 cups warm water
2 cups bread flower
2 cups all-purpose flour
2 teaspoons salt
1/4 cup lard (melted in microwave)
2 tablespoons warm water (to brush on loaves before baking)

Directions:

  • Grease a large bowl, set aside
  • In a large mixing bowl, dissolve the yeast and sugar in 1/4 cup warm water.  I've mentioned before how important it is to proof your yeast!  Let it sit in the water with the sugar for about 10 minutes and it's nice and foamy.  No foam - dead yeast!
  • Measure 1/4 cup lard and place in a Pyrex measuring cup and heat in the microwave for 1 minute or until just melted.
  • Add the rest of the warm water and the salt to the yeast mixture and stir until combined well.
  • Sift all 4 cups of flour together in a small bowl
  • Gradually add the flower mixture, a little at a time, to the wet ingredients in your bowl - mixing constantly.  At the same time you are adding flour, gradually pour in the melted lard.  keep adding a little flour and a little lard until all the lard is added.
  • Continue adding more flower a little at a time (seriously - don't just dump it all in!  I did this on the first batch and it was way too much.)  Use leftover flour rolling out the dough.
  • When you have sticky, elastic dough - turn it out onto a floured surface and knead until the dough is smooth and elastic.
  • Put dough into greased bowl and turn a few times to coat the dough.
  • Cover and place in a warm place for 45 minutes to an hour or until dough is double in size.
  • Turn dough out onto a lightly floured surface and divide the dough in 4 even pieces
  • Spray a cookie tray or baking sheet with oil or grease however you normally bake.  Sprinkle cookie sheet with cornmeal.
  • Shape each piece of dough into a loaf, placing it on the sheet 3" apart.  The shape of your loaf is up to you - we did ours on the sheets about 2 - 3 inches wide and about 9" long.
  • Put cookie sheet (or sheets - we used 2) in a warm place and let rise again until loaves are doubled in size - about 45 minutes.
  • Preheat your oven to 450 - place a pan of water on the lowest shelf of the oven.
  • Use a sharp knife to cut a shallow seam down the middle of the top of the bread, leaving about 1" of uncut top on each end of the loaves.
  • Brush the top of the loaves with water and place in your preheated oven on the middle shelf.
  • After 5 minutes of baking, brush some more water on top of the bread.
  • Total baking time for the loaves in our oven was 10 - 11 minutes.  Longer than that and the bottoms got really hard.  I also expected the loaves to get golden brown on top and overcooked a batch waiting for that color.  If your bread doesn't turn golden brown - it will still taste delicious.  Just watch the bottoms!
  • When bread is done, remove from the sheet and place on a cooling rack.
  • Slice as desired for sandwiches when the bread is cool.
Enjoy!

Wednesday, May 24, 2017

Homemade Hamburger Buns #1 (with recipe)

Jen is experimenting with homemade burger buns!  So this is attempt #1, we're naming it such because we're not 100% in love quite yet.  Tweaking and research must be done!  But just because we're going for knock-out amazing doesn't mean that these weren't good!  They were.

This recipe is quick and simple and even if you're not used to working with yeast breads, it's a breeze.

The recipe makes 6 large buns or 12 smaller buns - however you like to eat your burgers!


Ingredients:

  • 2 tablespoons active dry yeast
  • 1 cup warm water, plus 2 tablespoons warm water
  • 1/3 cup olive oil
  • 1/4 cup sugar
  • 1 egg
  • 1 teaspoon salt
  • 3-4 cups flour
Directions:
  • In a mixing bowl, dissolve yeast in warm water with a pinch of sugar (this is vital - yeast needs to come to life and it loves to feed on sugar!  I always proof my yeast this way)
  • Let yeast stand for 10 minutes or until it's nice and foamy as you can see in the picture - that means it's awake!
  • Add oil, remaining sugar, egg, salt and enough flour to form a soft dough (I used 3 cups flour)
  • Turn dough onto a floured surface and knead until smooth, about 3-5 minutes
  • Divide dough into 6 pieces (or 12 if you're doing smaller buns), roll into a ball and flatten/shape each as you want your buns to be.  Ours were large - we like big buns and we cannot lie!
  • Place each piece on a greased cookie sheet (or two if you need more room) - I spray my cookie sheets with coconut oil spray.
  • Cover and let rest for 10 minutes
  • Bake at 425 degrees for 8-12 minutes or until golden brown.
  • Remove from pan and place on a wire rack to cool (this is important!  I didn't remove mine and as you can see below - the bottoms were over-done by the time we were ready to slice!  I blame the wine.)

Like I said, these were very good, even the over-done bottoms (my fault) didn't ruin them.  We'll be experimenting with recipes until we find one that we can honestly say is to die for.  But these are an excellent, quick and simple bun that even Thing #5 liked!  Our picky little Bite.

Try them with your next burger adventure and let us know how yours turned out!


Friday, August 12, 2016

Blueberry Zucchini Bread

Alright.  After my chicken adventure, this is a post to boost my confidence in the kitchen!

I made two loaves of this deliciousness for the kids this weekend.  They will be devoured by Sunday, I promise!  This is 100% kid-approved by our picky eaters!  We just call it 'Blueberry Bread' and I always mix in the zucchini when they're outside or otherwise engaged.  They have no idea.  But when they ask if they can have this bread for breakfast, lunch, dinner, snack .... the answer is always yes!  anti-oxidants and vegetables .... and they think it's a treat!  WIN!

This recipe makes 2 loaves, if you have a smaller family you can freeze one loaf if you choose. It's never failed me.  But I guarantee you, you'll want to eat 1/2 a loaf on your own when you taste it. For those of you who don't click links, here it is:

Ingredients:
  • 21/4 cups sugar
  • 1 cup vegetable oil (I use olive oil)
  • 3 eggs
  • 2 teaspoons vanilla extract
  • 3 cups all-purpose flour
  • 1 teaspoon baking powder
  • 1/4 teaspoon baking soda
  • 1 teaspoon salt
  • 2 teaspoons ground cinnamon
  • 2 cups shredded zucchini
  • 2 cups frozen blueberries (use them frozen - they keep their shape and work better while folding into your batter)
Directions:

  • Preheat oven to 350 degrees
  • Coat two loaf pans with cooking spray
  • In a large bowl, with an electric mixer, beat sugar, oil, eggs and vanilla until smooth
  • Add flour, baking powder, baking soda, salt and cinnamon; mix well.
  • Stir in zucchini and gently fold in blueberries.
  • Evenly distribute batter between 2 prepared pans
  • Bake 60-65 minutes or until toothpick inserted in center comes out clean.
  • Cool 15 minutes, remove from pans to a wire rack to cool completely
It's delicious cold, warm with butter, toasted ... you could drag this bread through dirt and it would be amazing.  Please don't do that, though.

Enjoy!!!!

Saturday, May 28, 2016

Lavender White Chocolate Chunk Cookies


These cookies quickly became a favorite in our house! I found the recipe HERE and used dried lavender from our garden. I substituted Fleur de Sel Salt for the sea salt for a richer flavor. Huge hit!

We had a Doterra oils dinner party for friends where everyone had to make one thing using an essential oil and I decided to alter the recipe a bit more to fit the rules. I've never looked back! When using the food processor to blend the lavender flowers and sugar, I added two or three drops of Doterra Lavender essential oil and POW! Just what the cookies needed!

Amazing fact: these are SO quick and easy to make but incredibly impressive. Try them out!