Brownifer Bites

Wednesday, August 17, 2016

Homemade Pizza

I know, it's convenient to just order a pizza and call it good.  But once you try homemade pizza - you'll at least think twice about ordering take-out.  I will admit, on lazy days - we still have our favorite pizza we order.  Even those who love to cook .... just don't want to cook sometimes.

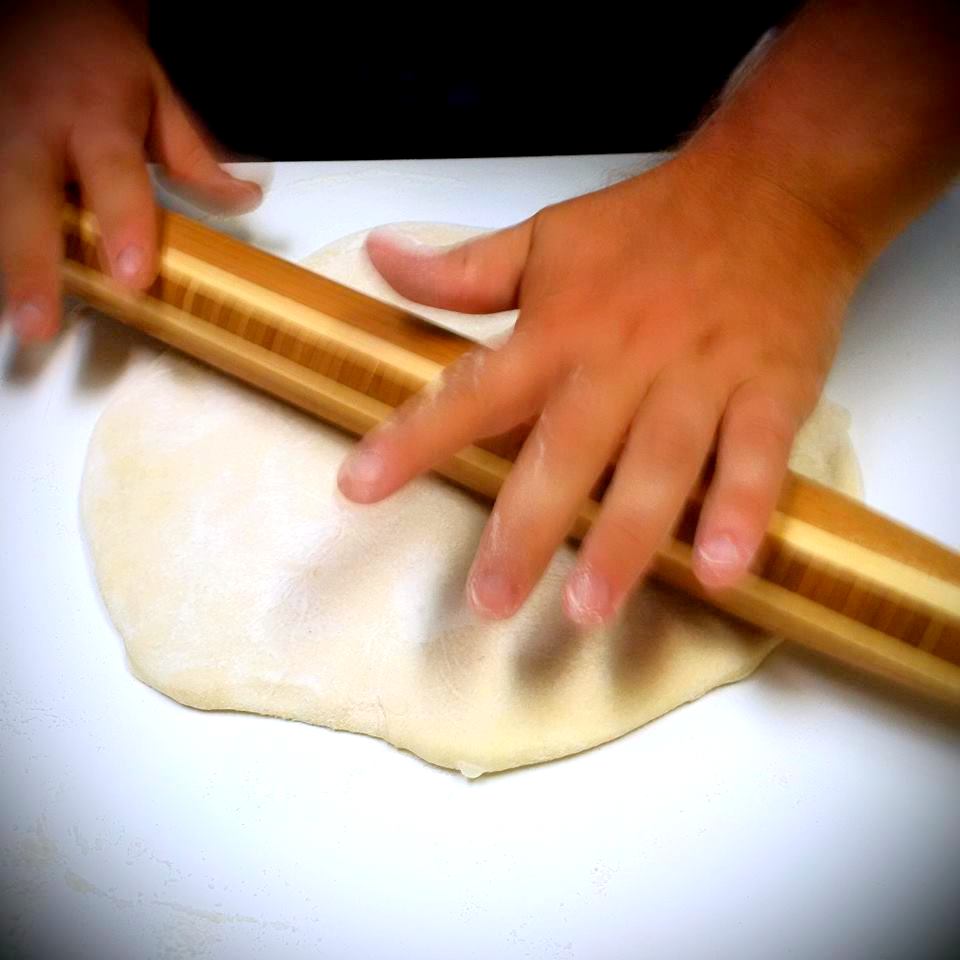
This is the absolute FIRST thing we made with Thing#1 through Thing #5 when we were first blending our (not so) little family.  They've always had fun rolling the dough and sprinkling cheese ... they've even made their own sauce before!  It's a family affair!
BEFORE BAKING

And it isn't that difficult!!!!! We haven't explored pizza dough recipes, though it's on our list of to-dos for sure. Our local Co-op carries a fantastic brand of dough made locally that we usually buy, but this time I was on the other end of town and picked up 4 balls of dough from Market of Choice that we had never tried.  We had to make FOUR PIZZAS!!!! Convenience-wise - it was perfect.  But the flavor wasn't quite as good as our normal dough.  Did we care feeding 9 people?  No. But lesson learned:  ready-made single-pizza servings of dough are SO convenient!!!

In the whir and blur of cooking and baking and birthday festivities, we didn't document every step with a photo for you, but I'm sure our readers have watched a pizza being put together before, so we have faith you'll fill in the blanks!  The recipe below is for 1 pizza, probably the equivalent of a medium in a pizza parlor. Yes, that is a link to our own Pizza Sauce recipe in the list below.  Try it, you won't regret it!

You'll Need:

  • 1 ball of pizza dough
  • Flour
  • Rolling Pin
  • Pizza Pan or stone
  • Grated/shredded low-moisture mozzarella cheese
  • Pizza Sauce
  • Toppings
Sounds easy so far, right!?

Directions:
  • Preheat your oven to the temperature required to bake your dough
  • Sprinkle some flour out and roll/toss your dough until it's the size and thickness you prefer
  • Put dough on pan and spread flat
  • Brush dough lightly with olive oil and sprinkle with a little garlic salt 
  • (Optional) Bake in the oven for 4-5 minutes to crisp up the dough
  • Spread your pizza sauce on your dough, however thick and plentiful as you like
  • Sprinkle some cheese, lay down your toppings, finish sprinkling with cheese
  • Bake until the crust on the bottom/center is cooked through
  • Let pizza rest for 5 minutes out of the oven before slicing
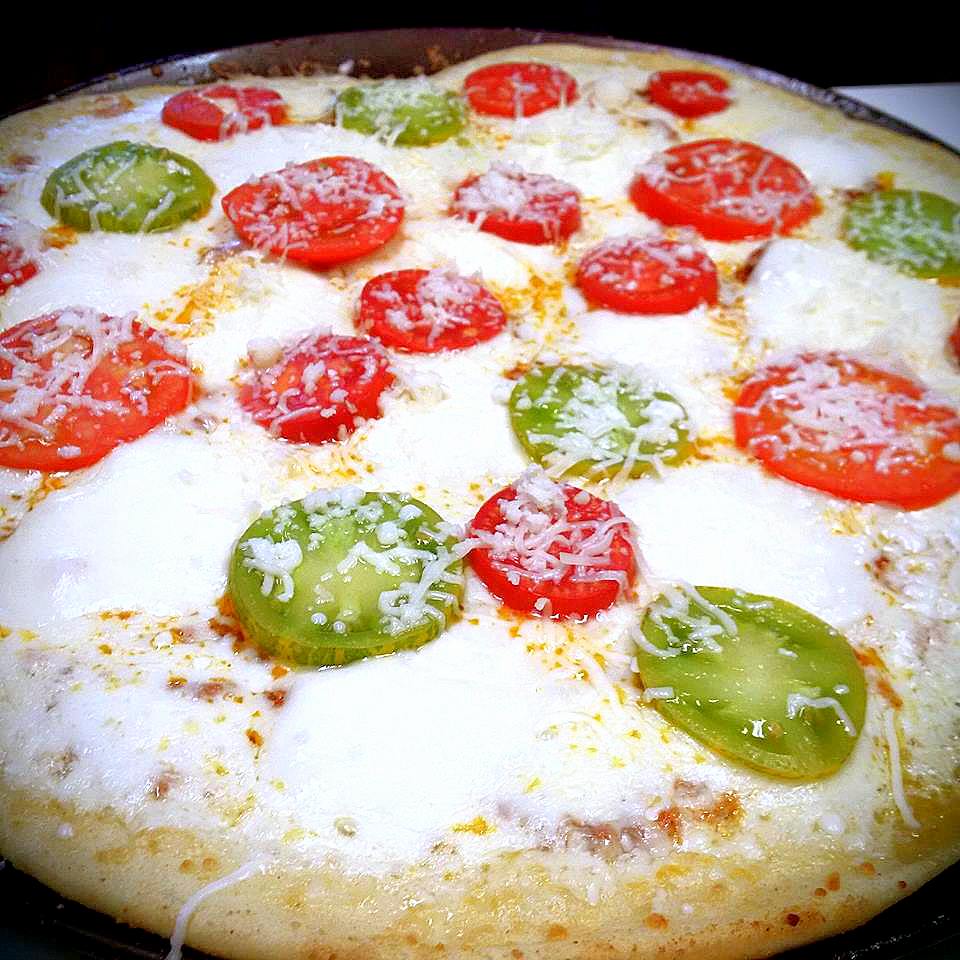
Tips:  If you're going to use fresh basil as a topping, as we did with our margherita pizza, do NOT bake it, sprinkle it on when the pizza comes out of the oven.

Those are Green Zebra and Polish Linguisa tomatoes from our garden - aren't they pretty!?  They were just as delicious as they look, I'm not gonna lie!

Get baking!!!!!


Jen's Teriyaki Chicken

This is a recipe we make often. It was a recipe my mom learned from one of my Japanese Aunties while living in Hawai'i and one of the first things I learned to cook as a teenager. It is now one of Brownie's favorites and was requested by Thing #4 as part of our weekend menu. It never fails and is always delicious!

I know, why make teriyaki when you can just buy it in a jar? Because MSG is evil and this is SO much better!!! :-)

So here it is, in all its glory:


Ingredients:
  • Chicken thighs (we used 4 lbs of chicken - we're a big family.)
  • 2 bottles Aloha Shoyu (If you can find it - Winco has this brand's lower salt soy sauce, which is what I use) or any low-salt soy sauce, though popular brands are waaaaay too salty for marinating in my opinion.
  • Green onions
  • 1 cup Brown Sugar
  • 1 Tablespoon fresh ground ginger (when I make this for the kiddos, I use probably 3 tablespoons dry ground ginger because if they get one bite with fresh ginger, they freak out)
  • 3 or 4 large cloves fresh minced garlic (more if you're inclined)
  • Cooked white rice and steamed broccoli
Directions:
  • Pour 1 bottle of soy sauce into large baking pan
  • Mix in brown sugar, minced garlic, ginger and 4 chopped green onions - adjust to taste
  • Place chicken thighs in marinade and let sit for 1/2 hour
  • Turn chicken thighs over in marinade and let sit for another 1/2 hour
  • Option #1: put pan in oven at 350 for about 30 minutes, turning chicken once 1/2 way through, remove from marinade with tongs as soon as you take it out of the oven (the cooked marinade is amazing over rice, BTW)
  • Option #2: grill chicken on the BBQ grill and discard the marinade - use second bottle of soy sauce to sprinkle over your rice
Rice and sides are totally your choice - this goes good with pretty much anything! This marinade is delicious with steaks as well!


Brownifer Pizza Sauce

So ... everyone knows by know my obsession with making our own ingredients to avoid MSG and unnecessary food additives.  Pizza sauce is one of these things.  Thing #3 requested homemade pizzas for his birthday this weekend, so of course, sauce had to be made. We made enough sauce for 4 pizzas with some leftover, and the batches worked out so well that I'm contemplating doing it again and canning some for future pizza-making adventures! :-)

I realize the photos aren't glamorous - I was working in a hurry for family and all I had was my Blackberry camera - so I apologize!  I will update the photos from our next batch with an actual camera! :-)  Recipe below will make 1 batch of sauce - enough for approx. 1 pizza


Ingredients:


  • 5-6 fresh Roma Tomatoes
  • 1 Handful Fresh Basil
  • 1/4 Large Onion
  •  4-5 Large Cloves Raw Garlic
  • 2 Tablespoons Dried Oregano
  • 1 teaspoon salt
  • 1/2 teaspoon black pepper
Directions:
  • Chop tomatoes into quarters, add all ingredients to blender until full
  • Blend into sauce (as seen below on left) - pour into sauce pan
  • Simmer on Medium heat (or higher if you're in a hurry and have time to watch it closely) until sauce is thick (as seen below on right) and ready to spread on your pizza dough.


You can see between these two pictures how far down our sauce cooked - it takes some time.  We started our 4 batches of sauce the night before and it simmered all night (I won't even tell you how late I was up - smaller batches cook down faster, I promise!).  Watch it CAREFULLY and stir often.  The sauce will settle and scorch quickly if it isn't stirred frequently enough.

I have always received compliments on my pizza sauce and this batch was no different.  There is just nothing that compares to homemade!!!!


Friday, August 12, 2016

Octopus Hot Dogs

It's a kiddos weekend! We cater to their culinary requests as well, as organically as we can :-)

This is one of their simple favorites and I thought we'd share it here. No recipe per say, you know how to make mac and cheese! But I'll explain the hot dogs.
About an inch from one end, insert the tip of your knife and cut in half all the way down, turn and cut again, giving you four equal 'legs'. Then cut each of the four legs in half as shown, giving you 8 legs. Use the tip of your knife to gouge two eyes in the head of the hot dog. Once all hot dogs are cut and ready, drop into boiling water and watch the legs curl up. When cooked, serve on top of mac and cheese and watch the kiddos giggle!

Enjoy!!! And because this crunchy mama can't stand to feed kids nothing but hot dogs and pasta...a plate of fruit! It IS summer, after all!


Blueberry Zucchini Bread

Alright.  After my chicken adventure, this is a post to boost my confidence in the kitchen!

I made two loaves of this deliciousness for the kids this weekend.  They will be devoured by Sunday, I promise!  This is 100% kid-approved by our picky eaters!  We just call it 'Blueberry Bread' and I always mix in the zucchini when they're outside or otherwise engaged.  They have no idea.  But when they ask if they can have this bread for breakfast, lunch, dinner, snack .... the answer is always yes!  anti-oxidants and vegetables .... and they think it's a treat!  WIN!

This recipe makes 2 loaves, if you have a smaller family you can freeze one loaf if you choose. It's never failed me.  But I guarantee you, you'll want to eat 1/2 a loaf on your own when you taste it. For those of you who don't click links, here it is:

Ingredients:
  • 21/4 cups sugar
  • 1 cup vegetable oil (I use olive oil)
  • 3 eggs
  • 2 teaspoons vanilla extract
  • 3 cups all-purpose flour
  • 1 teaspoon baking powder
  • 1/4 teaspoon baking soda
  • 1 teaspoon salt
  • 2 teaspoons ground cinnamon
  • 2 cups shredded zucchini
  • 2 cups frozen blueberries (use them frozen - they keep their shape and work better while folding into your batter)
Directions:

  • Preheat oven to 350 degrees
  • Coat two loaf pans with cooking spray
  • In a large bowl, with an electric mixer, beat sugar, oil, eggs and vanilla until smooth
  • Add flour, baking powder, baking soda, salt and cinnamon; mix well.
  • Stir in zucchini and gently fold in blueberries.
  • Evenly distribute batter between 2 prepared pans
  • Bake 60-65 minutes or until toothpick inserted in center comes out clean.
  • Cool 15 minutes, remove from pans to a wire rack to cool completely
It's delicious cold, warm with butter, toasted ... you could drag this bread through dirt and it would be amazing.  Please don't do that, though.

Enjoy!!!!

Italian Stuffed Chicken Breasts

I can't really tell you whether this experiment was a success or not.  But ... I vowed when we started this blog to share our successes AND failures so ... This is what happens when I experiment with new things when Brownie isn't home :-)  I will say this:  I'm not a fan of chicken breasts.  They're just too dry for me no matter how they're cooked.  I would have rather used thighs and made more of them to be truthful. Maybe I'll try that another time :-)

This recipe calls for marinara.  We had some San Marzanos ripe in the garden, a Green Zebra and a Pineapple heirloom so ... I made a quick marinara myself.  I didn't need much for this recipe anyway, so I kept it small.

I chopped the tomatoes we had, added some onion, fresh minced garlic and some chopped fresh basil with about 1 teaspoon of salt and put it all in a saucepan with a little olive oil over medium heat to cook down until the tomatoes start to looked 'cooked'.  No, I didn't remove the skins. When I make marinara to can, I remove the skins but for fresh ... I don't bother.

Once the tomatoes are cooked down, I put it all in the food processor and pulse it a few times (I like my marinara chunky). This is a good time to remove any large pieces of tomato skin that just don't look appetizing.  Once it's the consistency I want, it goes back into the pan to cook down more.  I turn the heat down to medium-low and just let it simmer while I cook and drink wine.  Stir it often!  By the time you need it, it will be done :-)

As for the chicken recipe ... here it is:

Ingredients:

  • 4 Chicken Breasts
  • 3/4 Cup grated fresh mozzarella
  •  1 Tablespoon Dried Oregano
  • 20 pepperoni, chopped (I used large pepperoni and used 5 slices)
  • 1/4 Cup Marinara
  • Fresh Basil
  • Romano Cheese
  • Salt
  • Pepper
  • Garlic Salt
Directions:
  • Using a paring knife, cut along the thick side of the chicken breast, leaving 1/2" on each end and create a pocket inside the chicken. (Be careful, I cut a few too far and the meat got too thin, leaked my stuffing out ... less is more.)
  • Combine mozzarella, pepperoni, oregano and marinara in a bowl and stir to mix
  • Spoon mixture into the pockets in your chicken breasts, dividing as evenly as you can
  • Rub chicken down with salt and pepper and garlic salt
  • Heat some olive oil in a pan and and place chicken breasts in pan over medium heat until seared on one side
  • Flip chicken breasts over, cover pan and cook for 6 minutes
  • Remove lid, flip breasts again, cover and cook for another 6 minutes
  • Remove breasts from pan, place on paper towels or on a rack to drain and rest (there will be juices from the cheese, marinara, pepperoni ....)
  • Slice breasts and place on a plate, drizzle with more marinara and sprinkle with grated Romano Cheese and fresh chopped basil
After Brownie's critique - I didn't get a good enough sear on my chicken.  He's the meat guy, we should have made this together.  As you can see in the photo, my stuffing also started leaking out. Not sure this 'pocket' idea is the best for chicken.  I am now determined to master stuffing chicken breasts!  I'll be playing with this idea more in the future. BUT the chicken was good, the Italian taste was there and Brownie helped me plate it so it looked pretty :-)

Try this one out and let me know if you had more success and share your tips with me! :-)


Thursday, August 11, 2016

Heirloom Tomato Flatbread Pizza


Okay, so this is a pretty common meal here in the Brownifer household, especially in the summer when we are swimming in heirloom tomatoes!  Yes, some of these tomatoes are our own.  We have Green Zebra tomatoes ripening and some smaller Pineapple tomatoes.  I stopped by our Co-op to pick up the bigger red ones to add some color - Brownie is hoarding his San Marzanos ;-)

We use flatbread because it's quick and easy - this week I bought some amazing flatbread at the Co-op but we've used Udi's and they're gluten-free - so no excuses for not making this pizza! ;-)

This recipe will make 4 small flatbread pizzas - so adjust your recipe accordingly!

Ingredients:

  • Flatbread (At least 4) 
  • Tomatoes - 4 large heirloom tomatoes or equivalent  - You can see up and over what we used.  There was one large red and one small orange tomato that we didn't use.
  • 1/2 cup Chopped Fresh Basil Leaves
  • 4-6 extra Basil Leaves for garnish
  • 1/2 Cup Chopped Onion
  • Olive OIl
  • 4-5 Cloves Fresh Garlic
  • Salt
  • 2 Balls Fresh Mozzarella Cheese
  • Romano Cheese


Directions:
  • Preheat oven to 400 degrees 
  • Chop tomato, onion and fresh basil, mix in a bowl with minced garlic and some salt (to taste) - combine to let flavors mingle
  • Brush flatbread with olive oil (more around the edges, less in the center)
  • Put flatbread in the oven until top of flatbread is crisp (3-5 minutes, checking often)
  • Remove bread from oven and set aside
  • Slice 1 ball of mozzarella thinly as possible and place evenly over 2 crusts and put back into the oven until mozzarella is melted - 5 minutes or so, checking off and on
  • Remove from oven, use slotted spoon to spread bruschetta onto pizzas, draining well before adding.
  • When both pizzas have desired toppings, grate a thin layer of Romano cheese over the top of each pizza
  • Place pizzas under the broiler for 2 -3 minutes or until cheese is melted and edges of crust are browned
  • Remove from oven, top each pizza with fresh, chopped basil, put on a plate and cut with a pizza cutter

So delicious you'll start stocking the freezer with flatbread! :-)  Enjoy and share your own creations with us!


Wine ... now I would rather have had some sparkling wine or champagne with this and honestly, it would have been amazing.

I bought a bottle of Barnard Griffin Fume Blanc.  It's a really good white, and it was okay with the pizzas, but not the perfect pairing.    I really would suggest a Brut Champagne or sparkling wine with these!